

I once asked a group of travel bloggers what they found to be the most frustrating part of having a blog. The most popular response? “Trying to make basic changes to my theme’s style.”
During the beginning stages of creating and publishing my blog, I remember often thinking, “for crying out loud! How hard can it be to make a simple color change to a title in the sidebar or make a feature image bigger?” Early on, I found myself wasting hours trying to make simple changes. On more than one occasion, the results were disastrous. At one point my sidebar even ended up below my footer.
I quickly learned that the key to success in this area is understanding CSS (Cascading Style Sheets). The purpose of CSS is to define how various HTML elements are displayed, and the reason they are called ‘cascading’ is because those definitions can be over-ridden further down stream. A set of style instructions laid out for the whole site can be over-ridden by another set of instructions at page level or at line level.
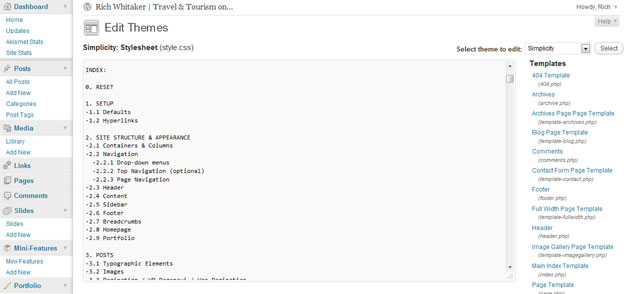
To access your CSS file(s) within WordPress, simply click on EDITOR which is found under the APPEARANCE tab.
Once you are in the theme editor, you will see a long list of template files on the right hand side. If you scroll all the way to the bottom, you will see your style sheets (style.css). It is worth noting that some themes have a custom style sheet (custom.css) for any changes. What this means is that any desired edits to the existing style sheet must be entered and saved on the custom file rather than the main style sheet.
Before going any further, take a moment to review some very basic CSS logic.
A CSS rule is made up of two parts. The first part is known as the selector and the second part is the declaration. The selector represents the HTML element you want to change while the declaration consists of a property and a value. More than one declaration can be paired with a selector.
The following is an example of a basic CSS rule which assigns a background color and a bottom border to the header area of your blog:

Now, let’s go back to the style sheet. Very near the top of most style sheets is an index which will help guide you through the file. Locate the element that you want to change within the index, scroll down through the file to find the CSS rule you want to change, then adjust it. Alternatively, if your theme has a custom CSS file, find the line with the rule you want to change. Copy this line, then paste it into your custom CSS where you can now modify it.
Now that you know how to make changes, consider all the types of changes that can be made to your blog’s CSS.
Start at the top and take a look at your header. Within the header, you can change the color of your background or perhaps add an image as a background. As you work your way through your blog, additional adjustments you might consider include altering the color of the text in your nav bar or the font type of your post titles. You can even modify the color of the background and text in your footer or the widget titles in your sidebar.
Once you get the hang of it, making changes to your theme’s style is really quite straightforward.
Below are five examples of how basic CSS rules can be used by a travel blogger to enhance their blog’s appearance.
Header – Here is an example of a CSS rule that includes a background image along with a four pixel blue border on the top and bottom of the header space.
#header-container {
                  background:url(images/primary_header.png) no-repeat;
                  border-top: 4px solid #0066cc;
                  border-bottom: 4px solid #0066cc;
                  }
Nav Bar – This example of a CSS rule defines the font size, font weight and font colorof links in the nav bar.
.nav a  {
        font:16px;
        font-weight: bold;
        color:#999999;
        }
Body – If you’re looking to change the main text color to dark gray and align it in nice clean blocks, this is how to do it.
.entry, .entry p  {
                  text-align: justify;
                  color:#333333;
                  }
Footer – Here are two different CSS rules. The first defines the background color of the footer as dark gray and the second defines the text color within the footer as white.
#footer-container { background:#333333; }
#footer a { color: #ffffff; }
Sidebar – This CSS rule states that the title background in the sidebar is blue and the title itself is displayed as white using the Myriad Pro font.
.widget h3 {
           background: #0066cc;
           color: #ffffff;
           font: 14px 'Myriad Pro', sans-serif;
           }
Being sharp-eyed, you’ll have noticed that some of the examples above start with element names prefixed with a dot and some with a hash. There’s not much practical difference to you if you are just trying to tweek colors and fonts for a particular element. The elements prefixed with a dot are classes. Classes tend to be used site-wide. In the HTML code they will look like this, a Division element with the classname “header”…
<div class="header"></div>
The hashed elements are IDs. They tend to be used for specific things. Here’s a Paragraph element called “announce”…
<p id="announce"></p>
What’s important to you when you are trying to find items to adjust on your site is the name, not what kind of element it is. That said, the more you know the better and if you want to learn more about how CSS works then the W3Schools Online web tutorials are a good start point.
Nice post. Cute model and hat in the photo, too!